How to submit a claim

Credit insurance help & support


A claim can be submitted one of two ways:

  • by converting an overdue to a claim; or
  • by submitting a claim directly.

If your buyer is Canadian and is covered under an export and domestic policy, you will need to submit a claim under each policy.

Ensure you understand the obligations under your policy for submitting a claim.

You should always refer to the "Claims and Overdue" section of your Coverage Certificate for the details of the claims waiting period that applies to your policy. For steps for how to view your Coverage Certificate, see How to view policy details.

To convert an overdue to a claim, follow these steps:

1. From the View menu, select Overdue Buyer History

2. From the list of overdues reported, highlight the overdue you would like to convert to a claim. Then click on the Details button.

Note: If your overdue buyer is covered under both an export and domestic policy, you will need to follow this step for both policies.

How to amend a declaration 1

3. From the Overdue Summary screen, click on the Convert to Claim button. 

How to amend a declaration 2

4. Complete the five tabs: a) General Information, b) Overdue Details, d) Claims Details, d) Invoices, and e) Documents/Comments.

How to amend a declaration 3

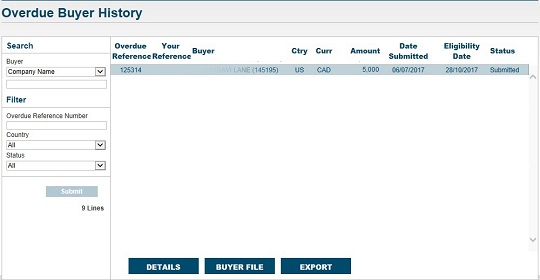
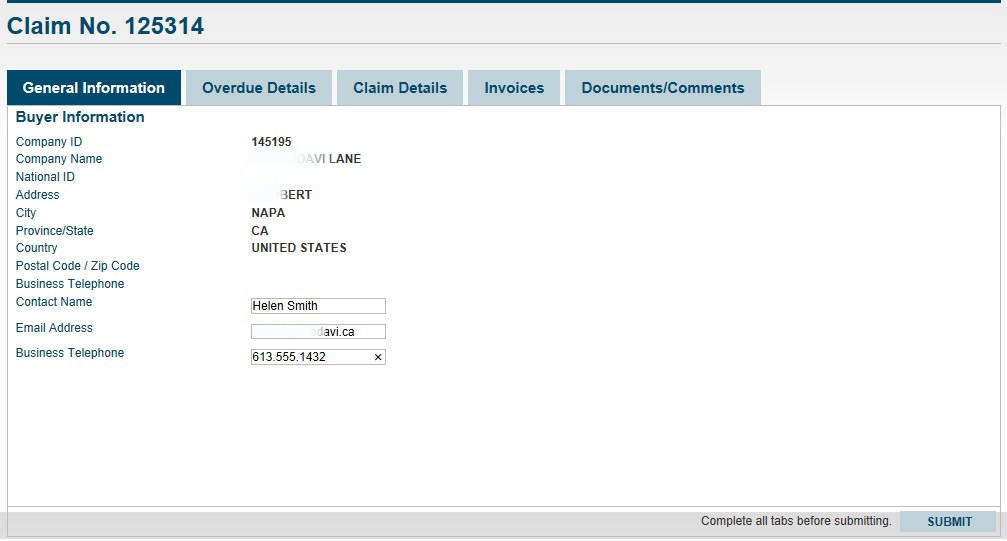
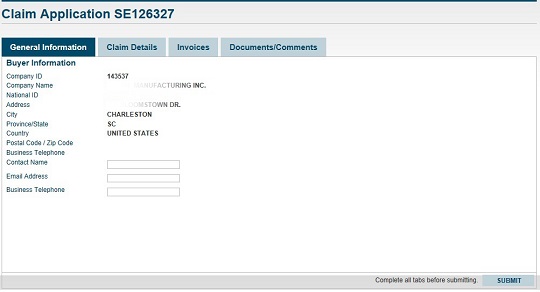
a) On the General information tab, ensure that the buyer’s contact information is filled out. 

b) Update any information required on the Overdue Details tab. 

c) On the Claims Details tab, fill out all the required fields. Read and scroll through the Collection Service Agreement (if applicable) and the Claim Terms and Conditions, making sure to click the “I Agree” checkbox. 

d) On the Invoices tab you can add line items for each unpaid invoice, credit note or payment. Enter the information into each field, then click on the Add button. A total amount will appear in the fields at the bottom of the screen. 

You can also upload your unpaid invoices (in *.csv file format) by clicking on the Bulk Upload button. Each row in the .CSV file must list the following values in the following order, including the semicolons: Document Number;Issue Date (DD/MM/YYYY);Due Date (DD/MM/YYYY);

Amount excl.tax;Amount incl.tax;Currency;Invoice (IN) or Credit/Payment (CN). Here’s a sample template for your reference.

How to amend a declaration 3

e) On the Documents/Comments tab you can add relevant comments and attach associated documents such as statements of account, proof of debt, proof of shipment and credit information.

5. When finished, click on the Submit button.     

6. An email will be sent to you acknowledging the claim submission for each policy. To view the submission, click on the View menu and select Claims History. The submission will be listed with a status of New Claim.

To submit a claim directly, follow these steps:

1. Click on the My Portfolio menu and select the Portfolio tab. A list of approved buyers will appear. Highlight the buyer for whom you would like to submit a claim.

There are several ways to select your buyer:

  • If your buyer is formally approved on your policy, you can search for your buyer via the Search functionality on the left hand side of the My Portfolio screen to filter your buyer list.
  • If you have multiple policies, you can also filter your buyers by policy number; export policy numbers contain a “E” and domestic policies contain a “D”.
  • If your buyer is not formally approved on your policy (being covered, for example, through your Discretionary Credit Limit), you can add the buyer by clicking Add and then completing the steps below.
On the My Portfolio screen, highlight the buyer for whom you would like to submit a claim

2. Click on the Manage Debt button.

If you have multiple policies, you will be prompted to select the policy before the Manage Debt  menu displays.

If your buyer is Canadian and is covered under both an export and domestic policy, you will need to report the overdue under both polices.

The Manage Debt button is also available in the top right corner of the buyer details screen. You can access buyer details by selecting a buyer and clicking on Details.

3. Select Submit New Claim from the pop-up window.

The Manage debt options list

4. Complete the four tabs on the Claim Declaration screen: a) General Information, b) Claims Details, c) Invoices and d) Documents/Comments.

How to amend a declaration 3

a) On the General Information tab, fill out the buyer’s contact information. 

b) On the Claims Details tab, fill out all the required fields. Read and scroll through the Collection Service Agreement (if applicable) and the Claim Terms and Conditions, making sure to click the “I Agree” checkbox.

c) On the Invoices tab you can add line items for each unpaid invoice, credit note or payment. Enter the information into each field, then click on the Add button. A total amount will appear in the fields at the bottom of the screen.

You can also upload your unpaid invoices (in *.CSV file format) by clicking on the Bulk Upload button.  Each row in the .CSV file must list the following values in the following order, including the semicolons: Document Number;Issue Date (DD/MM/YYYY);Due Date (DD/MM/YYYY);

Amount excl.tax;Amount incl.tax;Currency;Invoice (IN) or Credit/Payment (CN). Here’s a sample template for your reference.

How to amend a declaration 3

d) On the Documents/Comments tab you can add relevant comments and attach associated documents such as statements of account, proof of debt, proof of shipment and credit information.

5. When you have completed all tabs, click on the Submit button.

6. The Claims History screen will appear, listing all claims that have been submitted for each policy. The status of the claim just submitted will be New Claim.

Need help?

Speak to our customer care team weekdays between 8 a.m. and 8 p.m. ET at 1-800-229-0575 or support@edc.ca.

Date modified: 2019-03-12